Thursday, February 26, 2009

How to Transfer a student out of school

Transfers are going to become even more important at the end of the school year. Eighth grade students will need to be transferred to either Bishop Ahr High School or Cardinal McCarrick (the only high schools this year on PS) or as graduated. I will post more information on that later closer to the date. For now, when any student needs to be transferred here are the steps:

1) Log onto PowerSchool and type in the student's last name in the search box or choose the student through the alphabet or grade level functions in the middle of the screen.

2) Once the student's record is visible, move down the menu on the left side of the screen until you see "Functions" under the Enrollment heading.


Once you click on Functions, the second choice on the next screen will be "Transfer out of School", click on it. In this screen you will be able to put a transfer comment such as "parent request", "school request", "moving to another state" as a good way of gathering exit data. The date of the transfer will be the DAY AFTER the last day the student attended school - for example, if the last day the child was in school was May 1st the transfer day is May 2nd. Then choose from the drop down menu a reason for the transfer as seen in my example.


Once you click, "Submit" you should see the following on the screen and that means the transfer is complete.


If for some reason the transfer didn't go through, that means the teacher took attendance for the student and marked the student any code except "present." The attendance code will need to be changed to present in order to complete the transfer.

Would you like to print a copy of your teacher schedules or classes taught?

Administrators,

In our diocese we do not schedule the teachers' classes by period of the day, however, you can print copies of the list of classes they teach at one time if you are using Internet Explorer. Here's how:

Once you are logged onto PowerSchool, click on the "Teachers Schedules" link on the left hand side. You will see a page with all of the teachers' names listed on the left hand side. Right click in the white box with the names and choose "Print" from the gray box of options. Once the Print dialog box opens, click on the Options tab and put a checkmark in the box that says, "Print all linked documents." As illustrated in this picture:


The first page to print will be the list of teachers, the following pages will be the schedules for all of the teachers. Much easier than printing them one by one.

Tuesday, February 24, 2009

Need a list of Transfers this year?

Administrators,

Some of you have asked me for a list that will show the students who transferred out of the school during the school year. I have found a report that can help you know that information! It will give you the student's name, the date of the transfer and any information you may have added to the child's account when you transferred them out. Here's how to get the report:

Once you are logged onto PowerSchool, click on the "Reports" link on the left hand side. Click on the last choice, "Reporting Engine." On the list of reports in this section, choose the report "List-Transfer Out." See example:


As you can see on the picture, you need to choose "Current School Only" to run the report for your school since this is a report I can use at the diocesan level also. Go further down the page and choose the dates you wish to use - possible the first date of the school year up to the day you are running the report. See the example (also, the report will open in a new window, this is normal):


Put the checkmarks in the boxes opposite the dates you choose and then click submit. Once you click submit, depending on the dates you chose and the number of students the report will appear and you can then print it. Here is an example from my little "Ellis Academy" school:

Wednesday, February 11, 2009

Adding new registrations for the next school year

All,

Since it is now February and you are getting new students pre-registering from your open houses, you do have the ability to add them into PowerSchool now for the 2009-2010 school year. You do NOT have to do anything for the re-registering students you already have - the server will automatically move them to the next grade level when we take the system down in July to do the upgrade. If you pre-register a student and for some reason they do not attend your school in September, you just let me know and I will delete them from the system so you do not have to pay for the record.

When you enroll a student during the school year, you have a second step of enrolling them in a teacher's class. THIS STEP IS NOT DONE NOW. You will be enrolling all new and returning students in their homeroom and respective other classes in August when the system becomes available to you again.

Some of the following is a repeat from lesson one of this blog with a twist:

Here's the directions to enroll a new student now for the next school year(CLICK ON ANY PICTURE TO SEE IT LARGER):

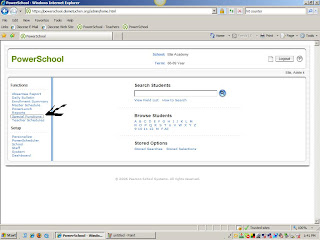
First, log on and choose the link for Special Functions:


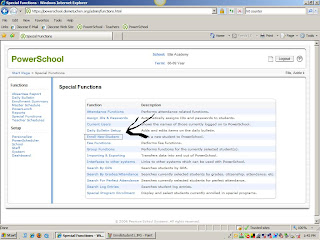
Then choose the link to Enroll New Student (all links in PowerSchool are alphabetically arranged):


Then complete the information on the following page. Do not forget to put in the FTE (this means full time equivalent - the child equals one full person in our school) and be careful to check the grade level. The most common mistake is that the grade level is not checked and the child automatically ends up in PreK or grade 9 depending on the school. Then you will have to call me because you are not able to fix it :)


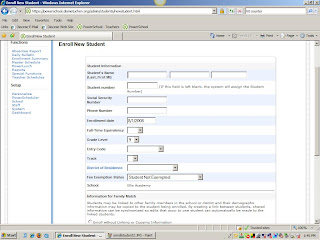
As you can see in this next picture, YOU MUST USE AN ENROLL DATE of 8/1/2009:


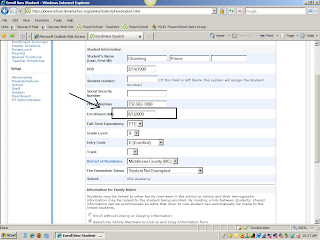
Beneath the items pictured you add the address, mother's name, father's name and sibling names if known. Once you click submit you will be taken to a page where students with the same last name, phone number or similar last names are shown. If the child is not one of those listed, don't worry if a sibling is listed, then click on continue and the child will be pre-registered in your school. You are not finished ~ the child's records must be updated with other information. Click on "Demographics Modify" on the left side of your screen and add other valuable information. Viewing the child will show them as being a member of your school by the initials of your school next to the name on the screen. You should also see the words "pre-registered" as in the picture below." If you do not, please contact me and we can see where the error occurred.