Wednesday, August 13, 2008

How to use the Daily Bulletin

The Daily Bulletin function can be use to give information to staff, parents,teachers, etc who have access to our PowerSchool system. To get to the daily bulletin, first click on "Special Functions."


Once on this page, click on the link that says "Daily Bulletin Setup."


From here there are 4 things to do - First, name the Bulletin - it could be as simple as "News for the Week of August 4" but if you don't put in a name it will not save. Second, put in a date. The date is automatically the date of the moment, however, you may want to run the news for more than one day, so choose and change the ending date.

Third, choose your audience. If you want everyone including parents to see it then choose "Public." If you only want administrators and teachers to see it choose "Teachers." For office staff only and me, choose "Administrators."

Finally, start typing. For longer and public information I advise to compose in a Word program with spell check and then cut and paste into this box. Click "Submit" and you will then be able to see your Daily Bulletin from the front page by clicking on Daily Bulletin on the left side of the page.


Did you Know - you can keep track of staff certification and degrees?

Again, our friend Melissa from Bishop Ahr has created a page that can be used by all schools on the staff section. To input information on staff degrees, years of hire, tenure, etc. Click on the staff window and choose a staff member by typing in the last name in the "Search Staff" box.

Once in the box, click on the left hand side "BGA Certification.


Once the page opens, complete the information. You will need to change it yearly, the system will not add the years. Please note: since this page was built for BGA, it does say "years at BGA." If you choose to use this page, it can not be modified to state your school name. You will need to ignore the wording.


Sunday, August 10, 2008

How to enroll one student at a time to classes


You've already added grouped students to the class lists. And sure enough, more students come to register after the class list has been given to the teacher. Before you rerun the list, you need to add the single new student to the class. This is done differently than the group enroll.

First, on the opening page of PowerSchool, type in the student's last name to find them. If you just enrolled the student and are at the "not enrolled screen" skip to the next step.


On the left hand side of the page, move down to the bottom section of the page under the heading of Schedule. Click on "Modify Schedule." The student's schedule, or lack of it, will be in the middle of the page. Choose the type of class that you wish listed. In my example I looked for available classes for Period 7. Our elementary schools have class expressions listed as HR for homeroom, Rel for religion, etc. Once the choices appear, check for the correct teacher and change the date to reflect the date the student joins (or joined) the class. Then once that's done go back to the blue link (next to the number 1) and click on the link to automatically enroll the student in the class.


Once you click the link, you should see the scheduled class under the student's schedule. If it is a lower grade class, the student will be enrolled in all classes associated with the homeroom. In that case, all new students from PreK - 8 should be enrolled in homeroom. For grades PreK-4, in most schools the students travel from one class to another as a homeroom and will automatically be enrolled in all classes. For grades 5-8 where students do not travel from one class to another as a homeroom, the students must be individually added to those classes in addition to the homeroom class.

Give classes from one teacher to another

When adding new teachers and giving them classes, it is best to transfer the class from the previous teacher to the new teacher than to create new classes. Creating new classes should only be as necessary for a class that did not previously exist.

Preferable prior to changing the past teacher to the status of "no longer here", add the new teacher to the system. Once the teacher is available in the system, click on teacher schedules from the opening page.


On the left hand side of the page, click on the name of the teacher currently assigned to the class. The teacher's schedule will appear in the middle-right section of the page. Click on the Section number (Sec #) of the class that needs to be transferred to the new teacher.


Once you click on the blue section number you will come to a page that contains all data related to the class. PLEASE do not click on or change anything other than the teacher. Move down with your mouse to the middle of the page where you can see the name of the teacher assigned to the class. Click on the arrow next to the teacher's name and all teachers assigned to the school will appear. Click on the name of the teacher the class should now be assigned to and go to the bottom of the page and click "Submit."


You can check if the change was completed by clicking on "teacher schedule" again on the left hand side and choose the new teacher. You should see the class with the new teacher. IMPORTANT NOTE: Each class MUST be done individually - there is no way at this time to transfer all of one teachers classes to another.

Saturday, August 9, 2008

Did you Know - You can keep track of employee attendance?

I will be publishing some "Did You Know" sections for new items that might be of interest to the schools. Melissa Conover from Bishop Ahr created a custom screen to keep track of teacher attendance. She was kind enough to make it available to all our schools.

To keep track of teacher absences, first click on "Staff" on the opening screen.


Then choose an employee by either typing their last name in the search box, or choose a letter of the alphabet to choose the teacher. Once you have the teacher's information on the screen, choose the "BGA Staff Attendance" option on the left hand side. Complete the information and save. You can write whatever you want - a date and the reason, whether sick or personal, or whatever text is needed. Don't forget to deduct the used days from the banked number.


Thursday, August 7, 2008

How to add New Staff

Once you log onto the PowerSchool site, look on the left hand side and choose from the menu "staff."


Once logged onto the staff page, click on the link "new staff."


When the new staff page opens, complete the information in the manner shown in the picture. Please note - an ID number MUST be assigned to complete the process. Choose any number between 3001 and 4000. If the number is taken, then it will bring you back and you can try with another number. At the bottom of the page (just as with the students, do not enter social security numbers and birthdates are optional for teachers. They can be input with just month and day if you wish, no year) choose staff status as either teacher or staff (office, nurse, principal, etc.) and then submit.


Once you have submitted the information, the screen that appears is the scheduling screen. If you have classes to transfer from one teacher to another that is the next lesson. If classes need to be add, then please contact me by phone or best, e-mail with what is needed. I must be notified of all new staff so I can set up their security.

Tuesday, August 5, 2008

Lesson 2 - Enroll a group of students in a class

Once you have the student in the system, you might see that the student's status is "not enrolled." This means the student is in your school however, not assigned any classes. In this lesson I will show you how to "mass enroll" a grade level into a teacher's class.

For many of the elementary schools, I have set up the lower grades (K-4) so that the staff will only have to enroll the students into a homeroom and the students will automatically filter into all of the associated classes; math, science, social, art, music, etc. Upper grades, such as grades 5-8 may not travel together as a "homeroom group" to some subjects so those classes are not associated. Next lesson will be on how to select individual students in the same grade for different classes. But for now, let's assume everyone in that grade is going into the same homeroom.

First, on your opening screen once you've logged on, click on a grade level. Remember, clicking on any pictures in this blog will make them bigger for you to see.


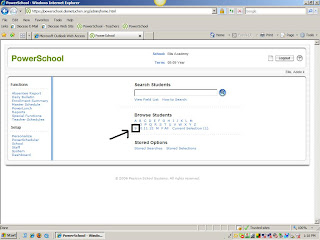
Once you see all of the students for that grade:


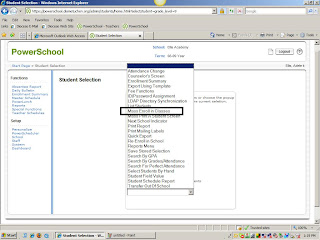
You will click on the empty box (this is considered the
"Function" box) and choose
"Mass Enroll in Classes." This will take all of the students to the next step.


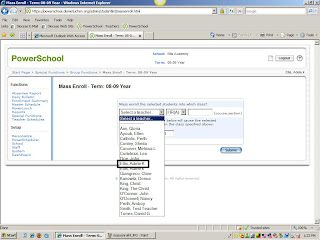
You will have to make some choices. First choice is the teacher. Click on the arrow under
"teacher" and choose the homeroom teacher, in this case it's me :)


You'll notice that the Expression section defaults as
"HR" which stands for Homeroom. Since this is what you need for now let it be. Next, choose the "course." The course begins with HR and is followed by the grade number. In the elementary schools it is either HRP, HRK, HR1, HR2, HR3, etc. The date is the next choice. It should be the date you are working on in the summer so the list can be available to you asap.


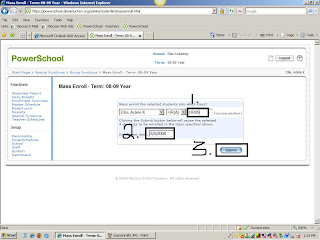
Once you see the green "processing" bar - wait. For the lower grades it will take a while because it is going to all classes the children will attend. For the upper grades it will be quicker since less classes are associated with the homeroom.

Once the process is complete it will tell you the number of students enrolled successfully in the class. If you want to check this, return to the beginning page of PowerSchool by clicking on the upper left hand corner logo and then click on "Teacher Schedules." Choose the schedule for the teacher whose class you just filled. You will see the number of students and can click on the blue number to see the names (my example has 5 children in the class even though you saw me enroll 4 because one student was already there - Minnie Mouse :)

Friday, August 1, 2008

First lesson - enrolling a new student

For those of you in class or need a refresher, here's the directions to enroll a new student(CLICK ON ANY PICTURE TO SEE IT LARGER):

First, log on and choose the link for Special Functions:


Then choose the link to Enroll New Student (all links in PowerSchool are alphabetically arranged):


Then complete the information on the following page. Do not forget to put in the FTE (this means full time equivalent - the child equals one full person in our school) and be careful to check the grade level. The most common mistake is that the grade level is not checked and the child automatically ends up in PreK or grade 9 depending on the school. Then you will have to call me because you are not able to fix it :)


Beneath the items pictured you add the address, mother's name, father's name and sibling names if known. Once you click submit you will be taken to a page where students with the same last name, phone number or similar last names are shown. If the child is not one of those listed, don't worry if a sibling is listed, then click on continue and the child will be enrolled into your school. You are not finished ~ the child's records must be updated with other information and then the child needs to be enrolled in a class. Viewing the child will show them as being a member of your school by the initials of your school next to the name on the screen. You will also see the words "not enrolled." Don't panic ~ it just means the student needs to be added to a class. That will be in the next post.

Welcome to the Administrator's Blog

Welcome to all our "seasoned" and new PowerSchool Administrators! I have a blog for teachers and a blog for parents but this one is just for you! I will post information that you have learned in sessions with me and I hope you will respond with helpful hints that you have learned so everyone can see them also or questions that I can answer for all. Use the history to look up particular areas of PowerSchool that may have been addressed in previous months. I look forward to making your job easier :)